Single Sign-on
Allow users to seamlessly navigate between the App Store and your app
In order to provide a seamless UX, it's possible to enable SSO between your app and the App Store. That way when a user is redirected to your app from the App Store, they can be automatically authenticated based on their existing session with us and won't have to key in their credentials again.
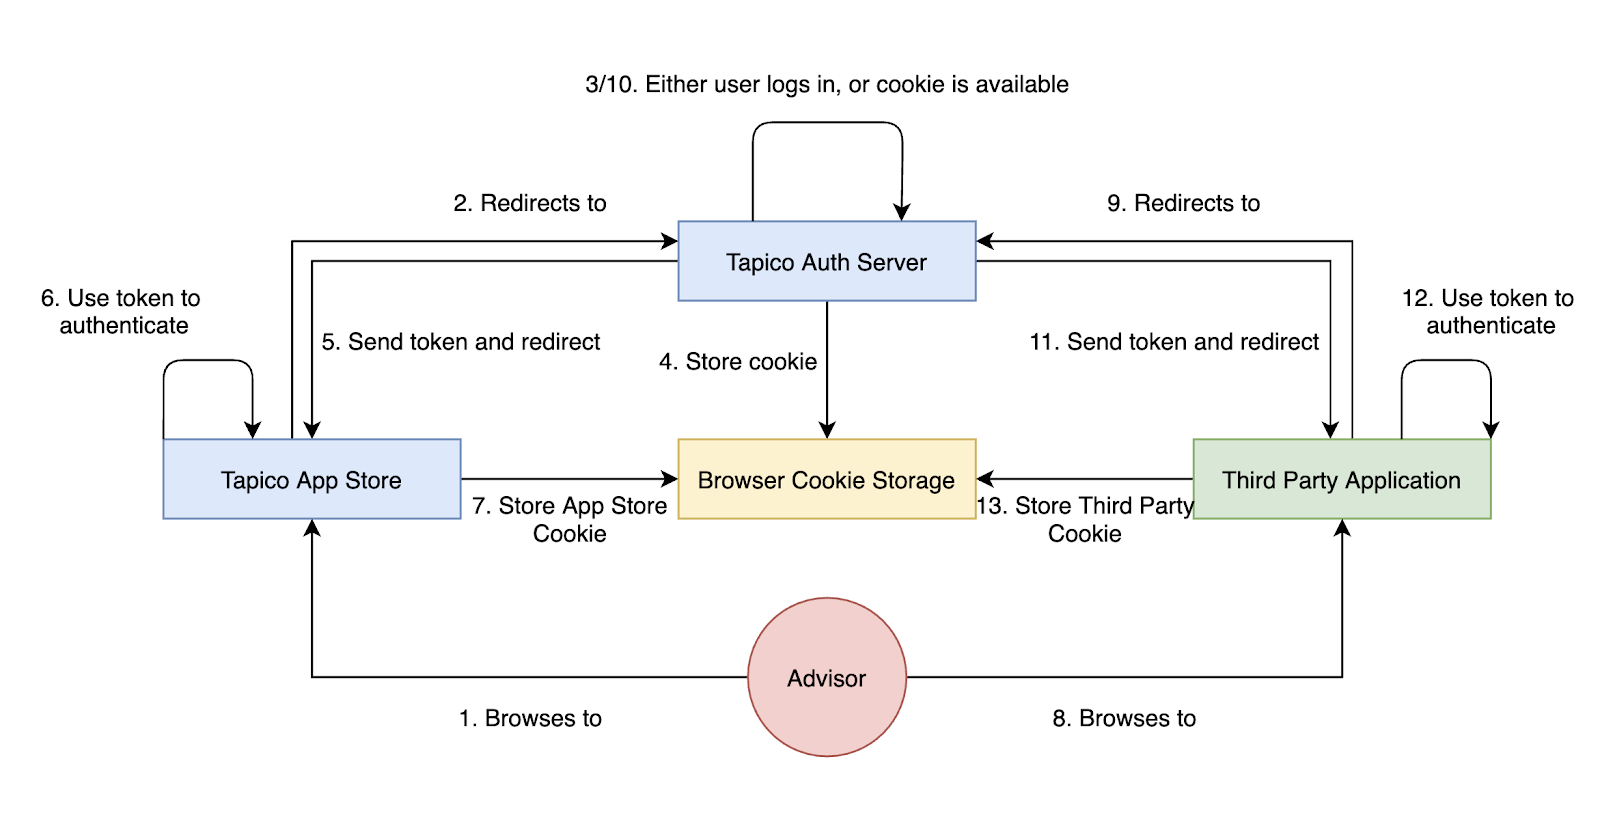
The API enables SSO through support of OpenID Connect. The following diagram shows how utilising a centralised auth server can allow different apps to authenticate a user based on a common session.

How offloading authentication to a centralised auth server enables SSO between apps
Signing in conforms to the OpenID Connect specification and will work with any certified client library.
Setting up SSO involves:
- Configure your app and generate API credentials -
client_idandclient_secret. - When a user is redirected to your app from the App Store, perform the auth code flow with our auth server and get back an
id_token. - Establish a mapping between the
id_tokenand a user in your app's system and then use this mapping to automatically SSO users into your app.
Overview - How the SSO works
Your app likely already has its own process for registering/authenticating users - Our SSO aims to augment this process.
The specific scenario we're interested in is when a user is redirected from the App Store to your app - Only when this happens should the SSO process with be triggered. When a user navigates to your app directly then your existing authentication mechanisms should apply.
Whenever we redirect a user to your app, we'll append the accountServicerId query string parameter to the URL - this identifies the specific instance of the App Store the user has come from.
Your app should detect the presence of this query string parameter and use it to determine when the user has been redirected from the App Store. If the accountServicerId is present then your app should trigger the SSO process.
When to trigger SSOWhen your app detects an
accountServicerIdquery string parameter in the URL, this means the user has been redirected from the App Store and SSO should be triggered
Step by step guide to setting up SSO
1. Enable SSO on the developer portal
Your Application should already be setup and have an associated client_id and client_secret. If you have not done this please see Create an Application.
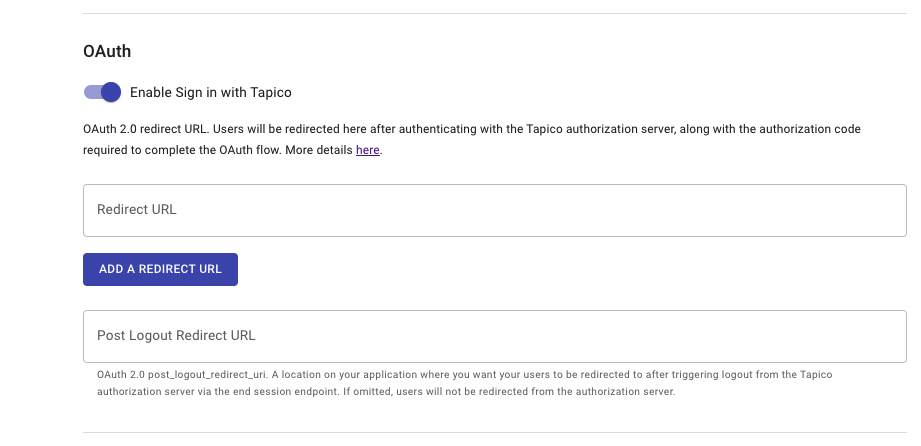
To set up SSO you'll need to enable the "Enable Sign in with Tapico" toggle and provide a Redirect URL

Under the Basic Details section of your app on the Developer Portal,
toggle the 'Enable Sign in with Tapico' on to expose the input field
2. Get an id_token using the OpenID Connect authorization code flow
id_token using the OpenID Connect authorization code flow2.1 Detect when a user has been redirected to your app from us
As mentioned above, when we redirect a user to your app the URL will contain the accountServicerId query string parameter. Your app will need some logic so that when it detects this it triggers the OpenID Connect auth code flow with us.
The end result of this process is an id_token from our auth server - This represents proof of the user's authentication by FNZ and provides identifying information about the user (email, name etc.)
2.2 Initiate the auth code flow
To initiate the OpenID Connect auth code flow you'll need to send an authorisation request to our auth server. There are a variety of certified client libraries in different languages that you can use to implement the flow: https://openid.net/developers/certified/
Our OpenID discovery documents can be found here:
- SANDBOX: https://auth.sandbox.tapico.io/oauth/.well-known/openid-configuration
- PROD: https://auth.prod.tapico.io/oauth/.well-known/openid-configuration
These contain all the configuration required to set up and initiate the SSO flow with us. OIDC client library APIs will often support initialisation by simply supplying the OIDC Discovery URI. The client library will then handle configuration for you.
A typical authorization request looks like this:
https://auth.sandbox.tapico.io/oauth/auth
?response_type=code
&client_id={YOUR_CLIENT_ID}
&redirect_uri={YOUR_REDIRECT_URI}
&scope=openid%20profile%20email
&state={STATE_STRING}
&accountServicerId={APP_STORE_ACCOUNT_SERVICER_ID}
This is the location that you need to redirect your user to in order to initiate the SSO process.
Authorization Request Parameters:
Parameter | Example | Description |
|---|---|---|
| {YOUR_CLIENT_ID} | REQUIRED. Unique identifier for your app. |
|
| REQUIRED. The authorization grant type being requested. For SSO we only support the value |
|
| REQUIRED. The permissions that your app is requesting for approval. This must include |
| REQUIRED. Your URI that the user will be redirected to once authorization is completed. This must match the | |
| {any_string} | RECOMMENDED. The state parameter is used both to prevent forgery attacks as well as to allow your app to preserve some state, which is replayed back to it upon successful authentication |
| {unique identifier} | REQUIRED. Unique identifier for the account servicer you wish to redirect the user to for authentication. When a user is redirected from the App Store to your app the |
2.3. User authentication
When the user is redirected to us via the URL mentioned above they will need need to be authenticated. As the user should have been redirected to your app via the App Store, they should already have an existing session and they'll be automatically authenticated. Otherwise they'll need to provide their login credentials to authenticate.
Once successfully authenticated, the user will be redirected back to your redirect_uri with a short lived code parameter. If you supplied a state parameter this will also be replayed back to you.
{YOUR_REDIRECT_URI}?code=xxxxxx&state={STATE_STRING}
2.4. Handling the redirect and retrieving the id_token and access_token
id_token and access_tokenLogic is required within your app on the redirect_uri page to extract the code and state query string parameters out of the URL.
This code is then exchanged for an id_token which represents the user's identity details, as defined by the requested scopes.
This is done by making the following POST request:
curl -X POST https://auth.sandbox.tapico.io/oauth/token \
  -H 'content-type: application/x-www-form-urlencoded' \
  -d 'grant_type=authorization_code&client_id={client_id}&code={code}&redirect_uri={redirect_uri}&client_secret={client_secret}'
The response will contain the id_token.
2.5. id_token explained
id_token explainedThe id_token is proof of the users authentication by FNZ - Your app can then use the data serialised in the token to automatically authenticate the user with your system.
The id_token contains the user’s identifying information in the form of a JWT (JSON Web Token). It contains some standard claims as defined in the OIDC Specification:
| Claim | Example | Description |
|---|---|---|
| iss | https://sandbox.tapico.io | Issuer - the issuer of the token |
| sub | {unique identifier} | Subject - FNZ Ecosystem Unique User ID |
| aud | {YOUR_CLIENT_ID} | Audience - Your appplication's client_id |
| exp | 1649290969 | Expiration Time - Expiry time of the token represented in Unix time format. |
| iat | 1649291569 | Issued at Time - The issue time of the token represented in Unix time format. |
And depending on the requested scopes may also contain:
| Claim | Example | Description |
|---|---|---|
| [email protected] | The authenticated user's email address. | |
| family_name | Kusanagi | The authenticated user's family name. |
| given_name | Motoko | The authenticated user’s given name. |
| https://tapico.io/servicing_organisations | : Company Name, code: Company Code}] | Lis |
Congratulations!You have now securely confirmed the user's identity using the details contained within the
id_token.
3. Use the id_token to SSO the user into your app
id_token to SSO the user into your appNow that you have the id_token, the next step is utilising this to SSO the user into your app.
There are three different scenarios you'll need to handle:
- A mapping already exists between the
id_tokenand a user in your app. - No mapping exists and this is a brand new user of your app who needs to register.
- No mapping exists and this is an existing user of your app who already has a login.
SSO using the id_token is predicated on establishing a mapping between it and a user in your app. Once this mapping is established, whenever you see this id_token you can use it to lookup the user and automatically sign them in - We'll cover the scenarios where this mapping is established first:
3.1 Brand new user is redirected from the App Store to your app
The user is redirected from the App Store to your app, with the accountServicerId appended to the URL. Your app detects this and triggers the auth code flow with our auth server and gets back an id_token.
As this is a brand new user to your app, the user doesn't exist in your system yet and therefore no mapping to the id_token can exist either.
Your app's standard Login/Registration process should now apply. For this scenario, as the user is brand new they must first register with your app. Optionally, you can use the data contained within the id_token to prepopulate the registration form (email, name etc.)
Once the user has successfully registered and is created in your app you should establish a mapping between the user and the id_token. This could be explicit via a mapping table to one of the attributes in the id_token e.g. the sub (subject), or it could be implicit by matching the users email with the email in the id_token.
3.2 Existing user is redirected from the App Store to your app
This scenario is very similar to the last, the main difference being that the user already has an account with your app.
If this is the very first time this user has come to your app via the App Store, then no mapping between the id_token and the user will exist and therefore you'll need to present your app's standard authentication process.
As the user already has an account with your app, they should select to Login. Once successfully authenticated, you can establish the mapping between the user and the id_token.
3.3 A mapping already exists between the user and the id_token
id_tokenIn this scenario the user has already been through one of the above two scenarios and so a mapping exists between the user in your app and the id_token.
After triggering the OpenID Connect auth code flow and getting back an id_token, your app should use this to lookup the associated user in your system and authenticate them automatically. No login or register screen will need to be displayed.
SSO SuccessThis is the core of how the SSO works - Establish a link between the user in your apps system and the
id_tokenyou get from us (which represents the user in our system). Once that link is established, you can automatically authenticate users based on the mapping.
Updated 5 months ago